A Challenging Time Capturing the Red Tower
Blending my passion for photography with a deep-rooted interest in history has been a rewarding aspect of my working life. Each time I press the camera shutter, I capture a piece of the past and find myself drawn to places where history still whispers its tales, offering glimpses into bygone eras.
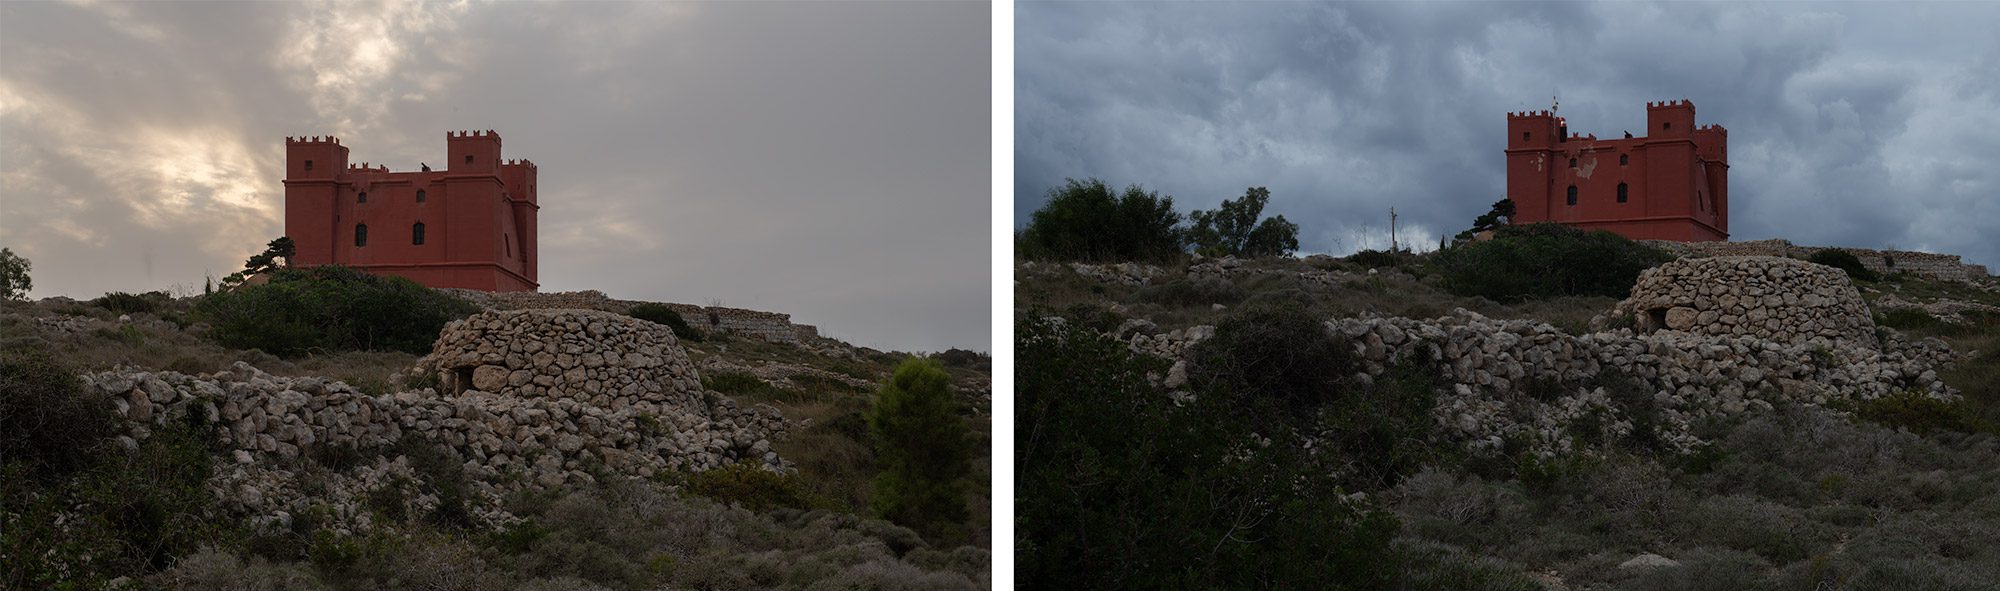
Recently, my two photo walks have taken me to the Red Tower, also known as St Agatha’s Tower, in Mellieha, Malta. This imposing structure is steeped in history and also proved challenging to capture in a single frame due to some rather uncooperative weather. Despite the disappointment of not achieving the planned image, with the help of some post-processing in Photoshop, I found a creative workaround for the images accompanying this post.
Historical Background of the Red Tower
Positioned strategically on the Marfa ridge, the imposing Red Tower offers panoramic views of Malta’s sister islands, Comino and Gozo. Originally commissioned by the Knights of St John, it was constructed between 1647 and 1649 during the reign of Grand Master Jean Paul Lascaris Castellar. The Red Tower formed part of the island’s coastal defensive network, a sentinel and signal station to warn off any enemy seaborne invasion.
Designed by Antonio Garmin, the Red Tower boasts a formidable appearance. Its square plan with four corner turrets and walls measuring almost five meters thick, along with the reinforced barrel-vaulted ceiling, was built to withstand the weight and force of cannons situated on the roof. Historically, it housed a garrison of thirty soldiers and was stocked with ample supplies to withstand a siege of forty days.
As Malta’s history shifted from the Knights’ rule to becoming part of the British Empire, the Red Tower adapted to different military roles. Eventually, serving as a radar and communication centre for the Maltese Armed Forces. By the end of the 20th century, the tower had fallen into disrepair. Thankfully, Din l-Art Helwa, a non-profit organization dedicated to preserving historic and artistic heritage, took control of the tower and undertook a major restoration project between 1999 and 2001. This restoration work included the replacement of damaged turrets, rebuilding walls and the roof, and restoring original features such as the floor and staircase.
Today, the Red Tower stands as a testament to Malta’s rich military history and serves as a stunning reminder of the island’s enduring resilience.
Capturing the Beauty of The Red Tower in Photography
The Red Tower offers a variety of photographic opportunities, which is not always the case with other historical landmarks in Malta. As the island is dominated by rapid urban sprawl, and the Tower stands as a bastion of history, in the countryside around Mellieha.
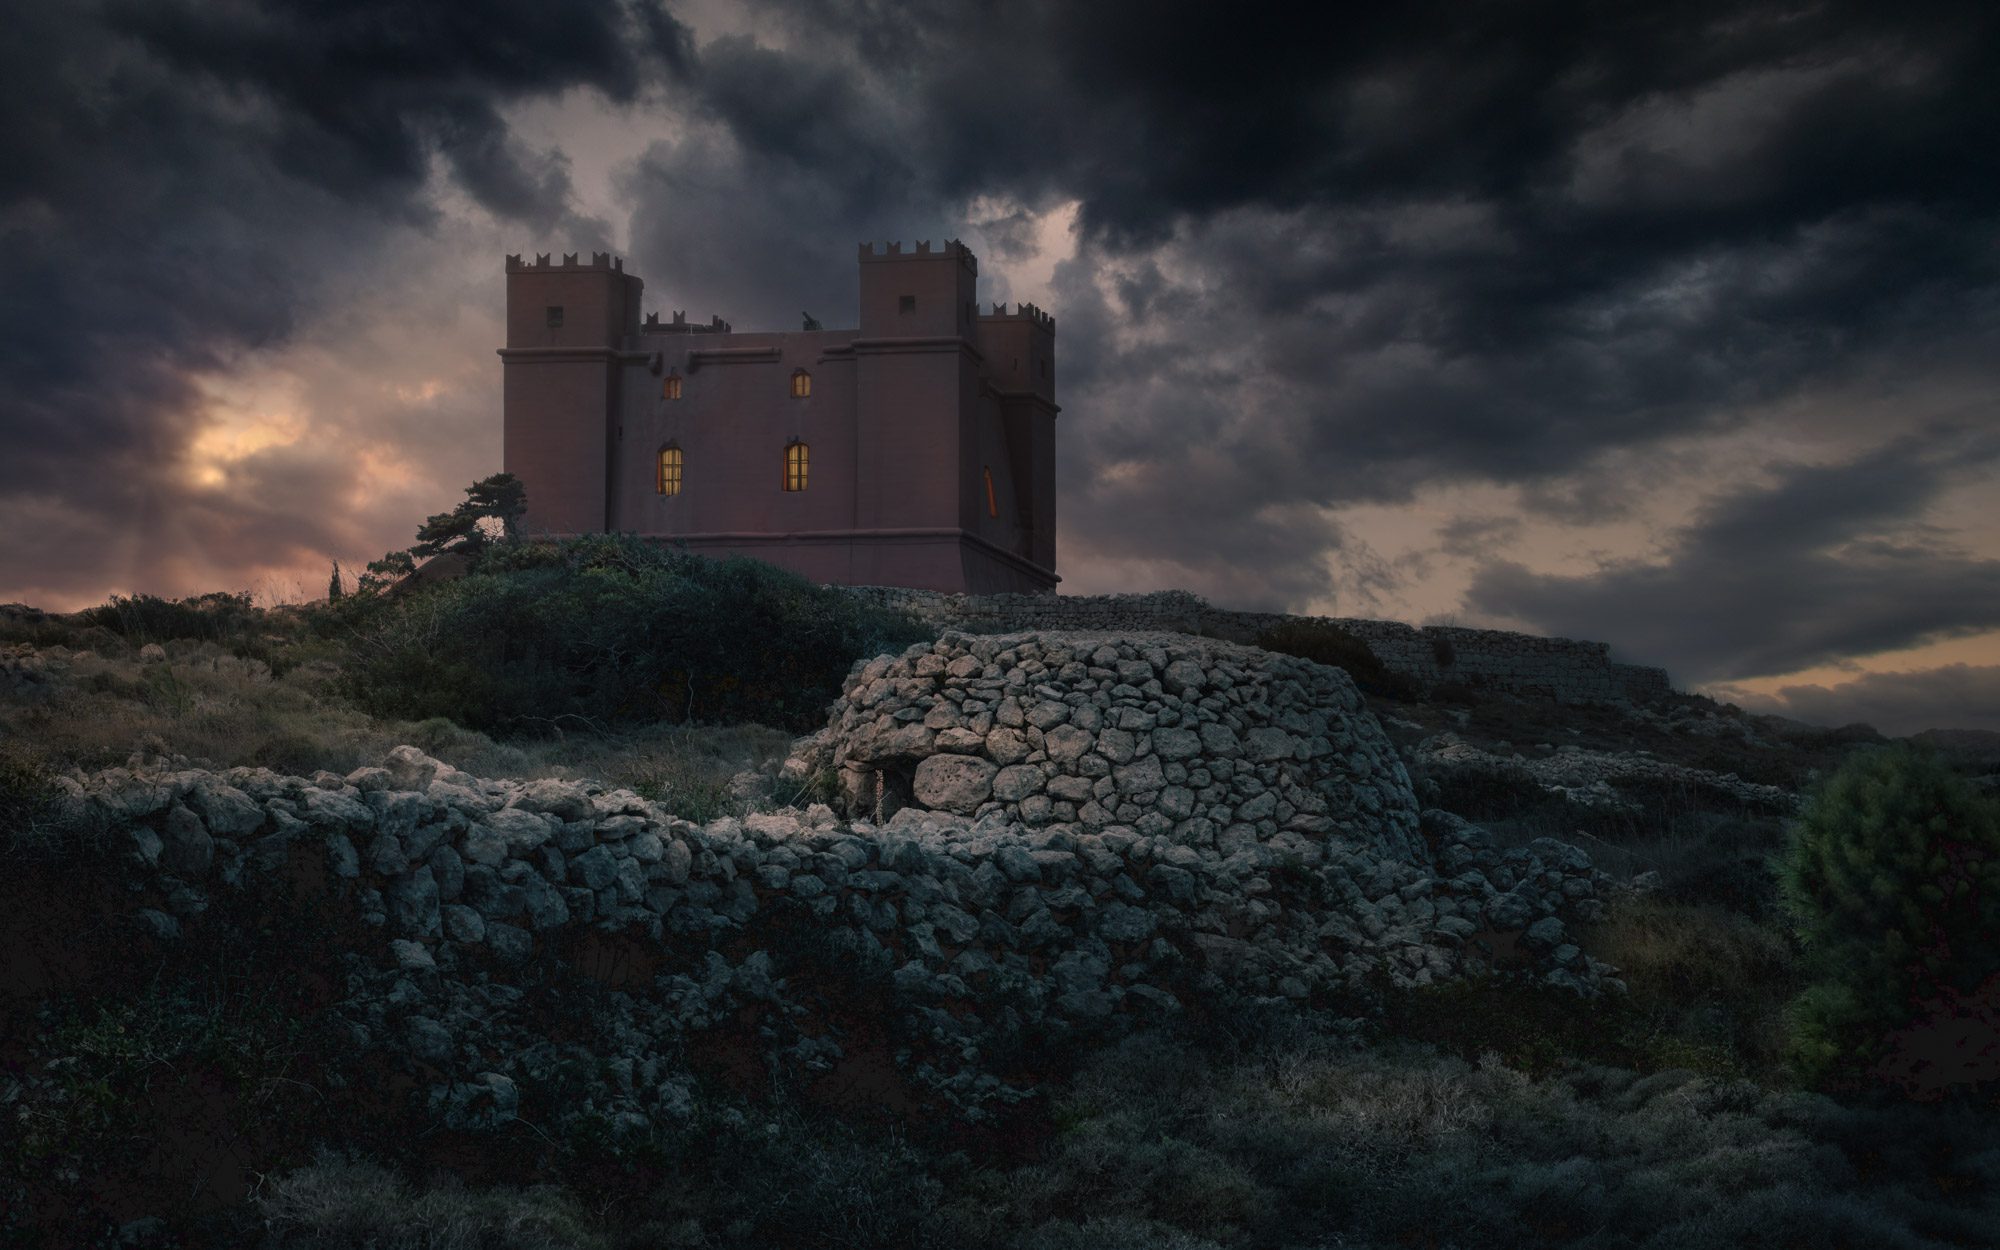
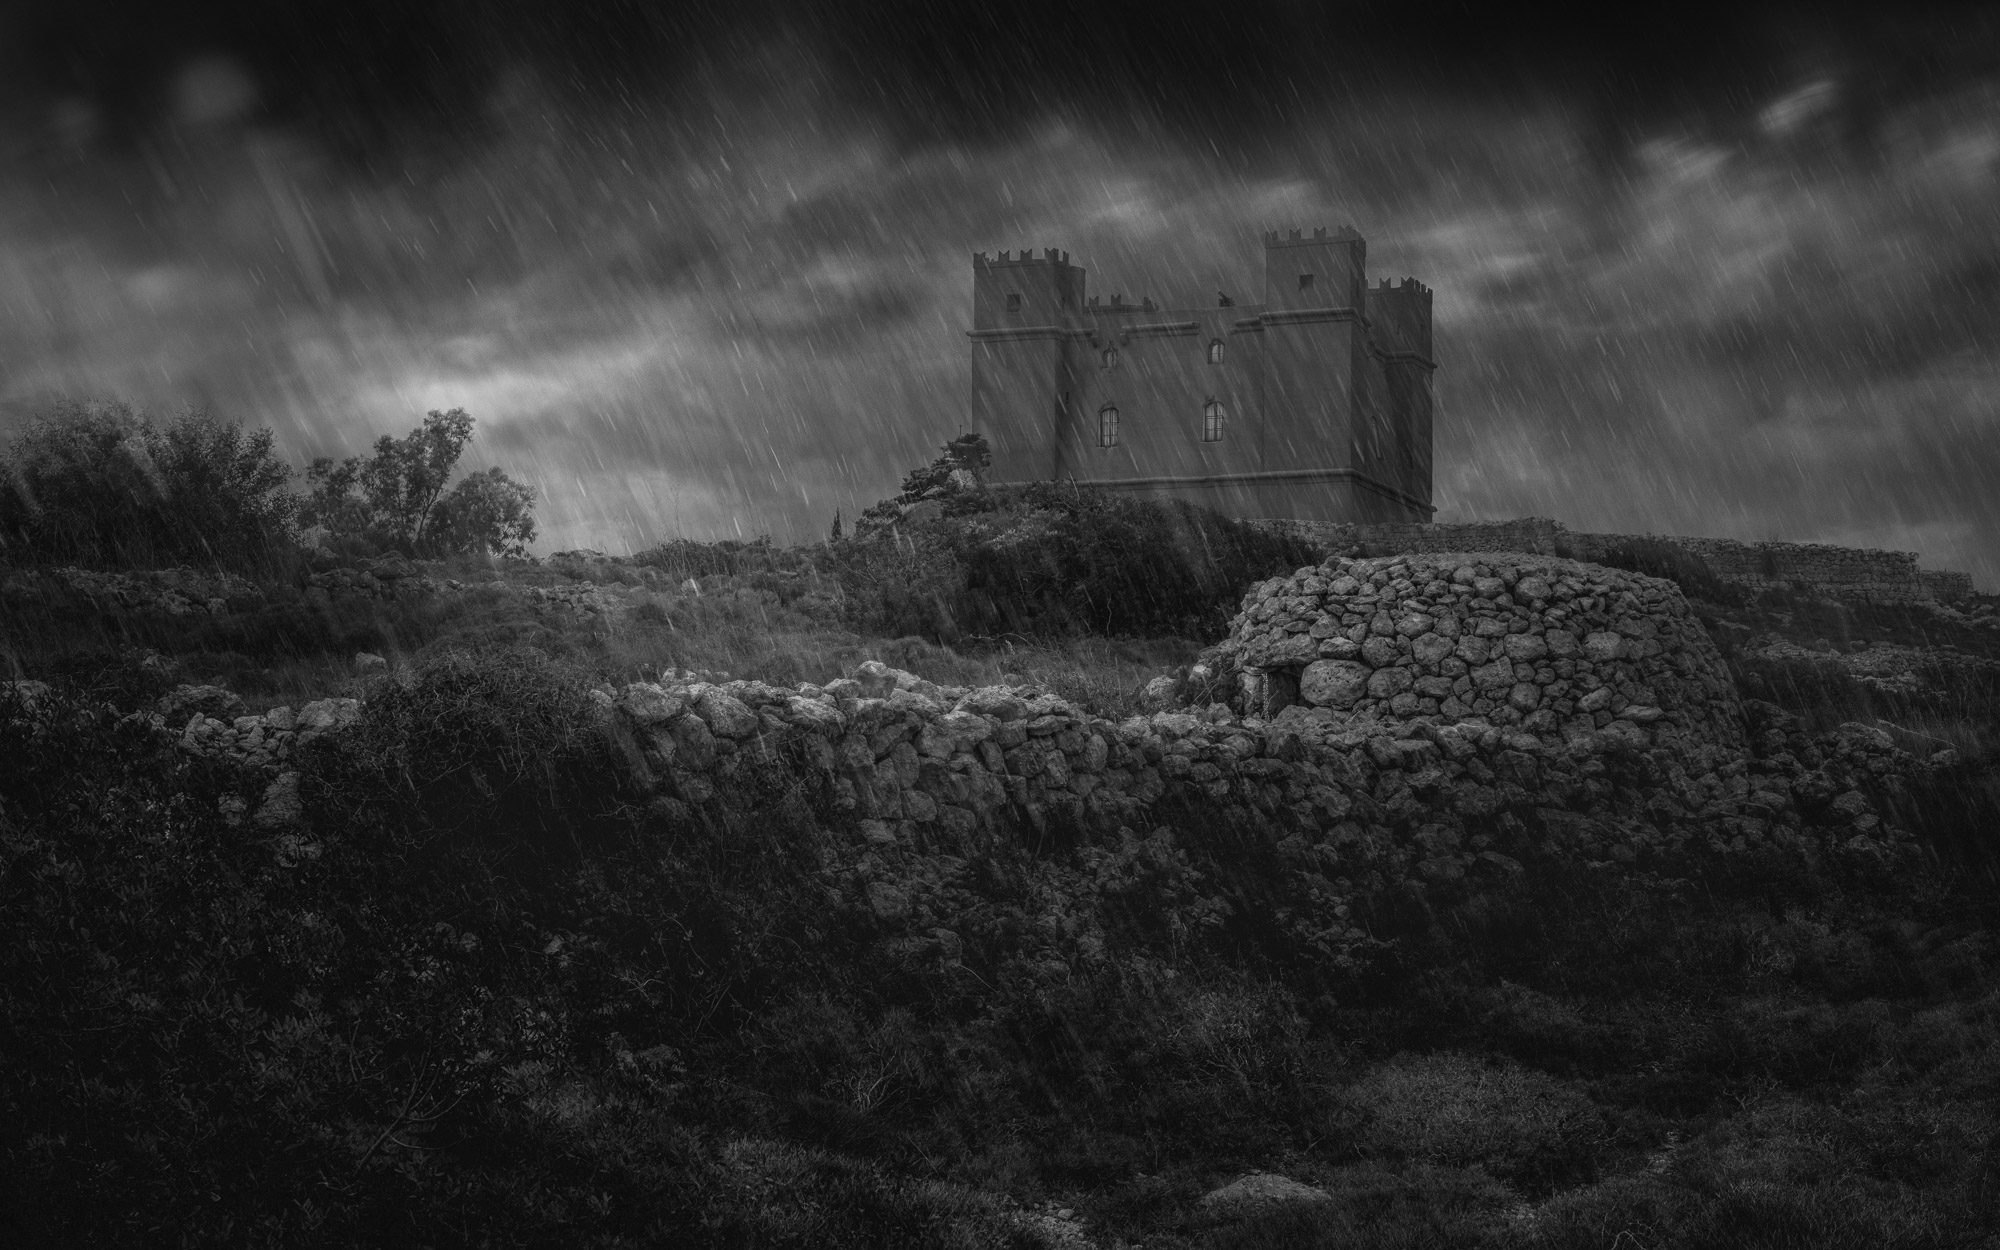
For the best camera angles, I found the north and east faces of the tower to be particularly captivating. With the aim of capturing the tower during sunset or the blue hour, I opted for the east face. The gentle slope of the terrain and the interesting dry stone rubble walls added depth and texture to the foreground. Additionally, a traditional Maltese “Grina” or corralled stone hut, located some 150m away, provided an intriguing element in the right of the frame, echoing the past lives of the farmers and their livestock.
As the days shortened, with sunset at 16:49, the presence of dark, ominous clouds continued to gather. However, experience has taught me that stormy conditions often present unique photographic opportunities, as the interplay of light on a stormy sky can dramatically transform a landscape image, as the setting sun paints the grey skies with vibrant hues of orange and yellow.
Accompanied by a fellow photographer and friend, we set up our cameras, and whiled away the time, talking about the transformation of photography through the introduction of AI. Unfortunately, the magic shooting hour came and went, and although our first attempt yielded a glimpse of the sun, our second attempt was cut short by the pouring rain, which was yet another stark reminder of the unpredictability of landscape photography.
Post-Processing Techniques
Back at my computer, I started by sifting through the images captured during the two sessions. My first impressions, as expected, are that the camera raw files simply reflect the scene as it was at the time of shooting. While the files are technically sound, they are completely devoid of the atmospheric mood I hoped to achieve at the Red Tower if the weather conditions had been right. Clearly, a fair bit of post-processing is needed.
Step 1: Selective Culling in Lightroom
The first step in my workflow involves importing the selected images into Lightroom. Given the number of shots typically taken during a photo session, this stage is crucial for focusing on the most promising images and conserving valuable drive space by eliminating unnecessary brackets or superfluous images. Culling is all about identifying photos that have the potential to be taken to the next stage in my workflow.
Step 2: Metadata Management
I must confess I find this task at times tedious, yet adding keywords and descriptions early in the workflow is invaluable. This additional metadata has paid dividends over time by simplifying the process of searching for specific raw files. Albeit an effort upfront that saves significant time in the long run.
Step 3: De-noising
Lightroom’s excellent de-noising tool has made me discard third-party plugins. I tend to use this feature for images captured in low light that need shadow detail recovery.
Step 4: Basic Corrections for a Neutral Base Image
The objective at this stage is to create a neutral base image for further editing. This involves tweaking the Colour, Exposure, Shadows, Highlights, and Contrast sliders to create an image with flat shadows and highlights.
Step 5: Perspective and Rotation Adjustments
Correcting the verticals and horizontals is crucial for architectural photography, by using the “Transform Tool”, and more often the “Guided Transform Tool”. For the Red Tower, since I was using a 50mm lens, very little correction was needed.
Moving to Photoshop
After laying the groundwork in Lightroom, the next step is to export the image to Photoshop.
Post-Processing Techniques in Photoshop
Step 1: Saving the Image
Upon exporting my images to Photoshop, I immediately save my master file in Photoshop’s PSB format. Since I work with smart objects and multiple layers, that significantly increase the file size this format is particularly useful.
Step 2: Retouch
The retouching needed for the Red Tower images was relatively minor and involved removing distractions like power cables, a pole, and a cell phone tower from the tower’s roof, as well as cleaning up areas of the towers distinctive red paintwork.
Step 3: Sky Replacement
The original sky in both images didn’t quite instil the dramatic mood I was aiming for. Using Photoshop’s sky replacement tool, I selected a replacement sky from my sky library and output it as a new layer. This allowed me to further refine the sky image mask and adjustment masks.
Step 4: Smart Objects
For these particular images of the Red Tower, I merged the sky and the retouched tower layer into a single layer and converted it to a smart object. My workflow often involves extensive use of smart objects, which allows for flexibility in editing and applying changes non-destructively.
Step 5: Tonal and Colour Adjustments applied as a Smart Filter
I am using the “Camera Raw” filter extensively for tonal and colour adjustments. The range of adjustments and masks available within the filter make it a powerful editing module, allowing me to fine-tune the image. I also converted one of the images to black and white using the “Camera Raw” filter.
Step 6: Highlights and Shadows using Layer Masks applied to Smart Objects
Now we get down to the creative bit. At this stage, I duplicate the smart object three times, labelling them “Base”, “Highlights”, and “Shadows”. I then go back into the smart filters of the “Highlights” layer and increase the exposure, brighten the highlights, and increase the vibrance. In the “Shadows” layer, I do the opposite by decreasing the exposure, reducing the highlights, and decreasing the vibrance. Once this is done, I add a layer mask to the smart object filled with black. Using brush and selection tools, I start painting in the shadows and highlights.
Step 7: Finalising the Image
At this stage, the image is just about complete. Any further tweaks in tonal range or colour are made using adjustment layers. The Red Tower colour image was also colour graded using a curves adjustment layer by modifying the RGB channel separately to add colour casts in the shadows and highlights.
Step 8: Black & White Image Processing with Rain Effect
Processing the black and white image of the Red Tower proved more complex. Beyond the initial stages (1 to 6), this image required an additional rain effect, which significantly added to the complexity. Adding the rain involved creating multiple layers and employing custom rain brushes, each used in combination with different blending modes to achieve the desired rain effect. Due to the intricate nature of this process, it warrants a more detailed explanation, which in turn would need an another blog post.
Returning to Lightroom
Once the post-processing in Photoshop was completed, the red Tower images’ colour and black & white versions were reimported into Lightroom. Here, I conducted further fine-tuning of the images’ tonality and colour. The final step in my Red Tower workflow involved cropping the photos and exporting them as tiffs and web-ready jpgs.
Final Thoughts
Reflecting on the post-processing section of this blog, I can’t help but smile, as it feels somewhat like trying to host a photo exhibition on the radio! My aim in this post is to provide a glimpse into the image treatment used in these particular images. I enjoy working on image manipulation, as it allows me to really stretch my Photoshop skills in ways that street photography doesn’t permit.
My philosophy when approaching photo manipulation is to adopt a stylistic and dramatic approach, focusing on mood and atmosphere rather than simply presenting it as a straightforward capture. It’s about adding a layer of artistic interpretation to the original scene. For those interested in exploring similar techniques, I highly recommend checking out Jamie R Mathlin’s YouTube channel. He offers some fantastic day-to-night photo manipulation tutorials, predominantly using a Lightroom workflow. I’ll include a link to his channel for further exploration.
I’d love to hear your thoughts or answer any questions you might have about this process. Feel free to get in touch!
Links
Day to night photo manipulation in Lightroom by Jamie R Mathlin – https://www.youtube.com/@jamiermathlin
Further information about the Red Tower ( St Agatha’s Tower) and other sites run by Din l-Art Helwa – https://dinlarthelwa.org